If you’re in the construction, mining, or rock drilling industry, you’ve probably encountered air leg drills on worksites—those compact, powerful tools that make breaking rock or concrete feel manageable. As someone who’s supplied air legs for over a decade, I get asked a lot by new operators and even veteran drillers: “Is it difficult to install an air leg?” The short answer is: it doesn’t have to be. The long answer involves understanding the tool’s design, avoiding common pitfalls, and leaning on the right support when you need it. Let’s break this down, from unpacking your first air leg to getting it set up and ready to use. Air Leg
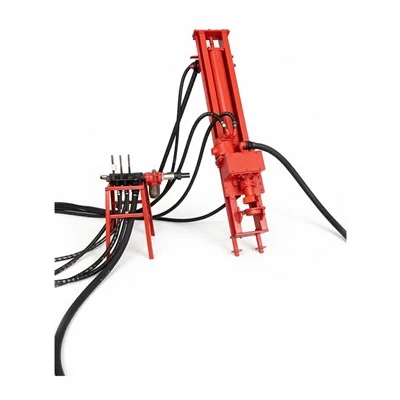
First, let’s demystify what an air leg actually is. For those who might be new to the equipment, an air leg is a pneumatic support system paired with a drill machine, designed to hold the drill steady during vertical or angled drilling. It uses compressed air to extend and retract, eliminating the need for a worker to manually support the heavy drill (which can weigh 50+ pounds on its own). That’s why they’re staples in underground mining, tunnel construction, and rock excavation—they boost both safety and efficiency by reducing worker fatigue and keeping drilling consistent.
Now, back to the installation question. Early on, when I first started out supplying these tools, I saw a lot of operators skip the basic prep and end up frustrated, thinking the air leg itself was faulty, when the issue was just a messy installation. The key here is that difficulty is less about the tool and more about your approach. Let’s walk through the process step by step, as I teach new customers in our on-site training sessions.
First, prep work. You can’t just unbox an air leg and start connecting parts. First, gather your space and supplies. You’ll need a flat, stable surface to set up, your air compressor (rated for the tool’s required CFM—most standard air legs need between 10 and 25 CFM at 90 PSI, so make sure your compressor matches that; a common mistake is using a too-small compressor that can’t power the leg, leading to installation errors), a drill rod (matched to your air leg’s model—sizes vary, so double-check your manual), and basic tools: wrenches, Teflon tape, and a pressure gauge. Wait, did I mention the manual? Always, always reference the specific manual for your air leg model. There are slight variations between brands and even models within the same line, so generic tips only go so far.
Once prep is done, the first physical step is assembling the air leg’s main components. Most air legs come in three main pieces: the leg cylinder itself, the drill carriage (which holds the drill motor), and the foot assembly that anchors to the ground or worksurface. For smaller, portable models, this is straightforward—you just align the carriage with the leg’s mounting bolts and tighten with your wrench. Larger industrial models might have a few more parts, like a counterbalance spring, but even then, it’s a bolt-and-align process. A common misstep here is overtightening bolts, which can warp the mounting brackets over time, or failing to lubricate the O-rings on the connections. Air legs rely on pneumatic seals, and dry O-rings can get nicked during installation, leading to air leaks down the line. That’s a quick fix if you catch it, but it’s annoying to troubleshoot once you’re mid-drill setup.
Next, the air line connection. This is where a lot of people stumble. You need to wrap Teflon tape clockwise around the male threads of the air hose connector—always clockwise, because when you screw the hose on, the tape won’t unwind. Skipping Teflon tape is a surefire way to get air leaks, which will make the leg extend unevenly or not at all. Once connected, turn on the compressor slowly at first, testing the air pressure to make sure it’s at the manufacturer’s recommended PSI (usually 80-100 PSI for most models). If the leg lurches forward or doesn’t extend smoothly, check the air line for kinks, or the pressure regulator on your compressor. It’s a simple check, but it’s one that trips up first-time installers all the time.
Then, anchoring the air leg. This is arguably the most important part of installation, because a poorly anchored leg can shift during drilling, leading to missed holes or even safety hazards. For vertical drilling (like in tunnel ceilings), you’ll anchor the foot plate to the ground or floor with expansion bolts, or use a temporary anchor if you’re on a soft surface. For angled drilling, adjust the leg’s pivot points so the drill is at the exact angle you need, then lock the pivot bolts firmly in place. A lot of people rush this step, just tightening the bolts loosely so they can adjust quickly later—but that’s a mistake. If the leg shifts mid-drill, the drill can wander, which wastes material and time, and even can cause the drill bit to break.
Now, is there any case where installing an air leg is actually difficult? Sure, if you’re working in cramped spaces, like a narrow underground mine tunnel, where you can’t lay out all your tools easily. Or if you’re working with a large, heavy industrial model that requires two people to lift, rather than one. That’s why we offer on-site installation support for customers who need it—no extra charge for first-time setup, just a quick walkthrough to make sure you’re comfortable. We also send digital manuals with video guides for every model, so you can follow along step by step, even if you’re not mechanically inclined.
Over the years, I’ve seen countless customers go from stressing about installation to doing it in under 15 minutes once they get the hang of it. The trick isn’t to memorize every part—it’s to take it slow, check each connection, and test before you start drilling. I remember one customer last year, a small mining operation in Colorado, who called me panicking because he thought his air leg was broken. He’d skipped lubricating the O-rings, and a seal had nicked during assembly, leading to a slow air leak. I walked him through replacing the O-ring (we include a spare set with every air leg we sell) and in 20 minutes, he was set up and drilling. That’s the kind of issue we’re here to help with, not just selling the product.
Now, let’s address the “professional vs. DIY” angle, because a lot of people wonder if hiring a professional makes a difference. For most standard air legs, installed on a level worksite, a competent operator can do it themselves with the right tools. But if you’re working on a large project, or you’re not familiar with pneumatic equipment, it’s worth having someone with experience help for the first time. We also offer training sessions for teams, so your whole crew knows how to install, maintain, and troubleshoot their air legs without needing to call us every time there’s a small issue.
Maintenance, which ties into installation, is another point. A lot of people think installation stops when you turn on the compressor, but pre-lubricating the air leg before every use is part of proper setup. We include a small lubricant bottle with every unit, and remind customers to add a few drops to the air line before connecting it to the compressor. This keeps the seals working smoothly, reduces wear, and makes installation and operation easier every time.
Wait, let’s touch on common myths too. Some people think air legs are too complicated for small operations, but we sell plenty of compact, portable models for small construction crews or hobbyist excavators. Those models have simplified installation—no heavy bolts, just quick connects for the air line. I’ve seen a homeowner use one to break up a concrete patio, and they installed it in 10 minutes with no prior experience. The key is matching the right air leg to your needs, which is why we take time to ask customers about their project size, compressor capacity, and drilling goals before suggesting a model.
So, circling back to the original question: Is installing an air leg difficult? For 90% of people, no, as long as you follow the steps, don’t skip prep, and have the right tools. For the 10% who are working in tight spaces or with large industrial models, it’s a bit more work, but not impossible—and we’re here to support you through it.
At the end of the day, the hardest part of using an air leg isn’t installing it—it’s finding the right one for your project, and having someone to turn to when you run into a small issue. If you’re in the market for an air leg, or you’ve tried installing one before and ran into trouble, we’re here to help. Whether you need advice on choosing a model, a walkthrough of the installation process, or replacement parts, our team is ready to assist. To discuss your specific needs and get tailored guidance for your project, reach out to our team. We’ll make sure you’re set up for success from the first installation to ongoing use.
Air Leg References:
- Mine Safety and Health Administration. (2020). Pneumatic Drilling Equipment Installation and Maintenance Guidelines. U.S. Department of Labor.
- Construction Equipment Association. (2021). Portable Pneumatic Tool Installation Best Practices. CEA Technical Bulletin.
- International Association of Drilling Contractors. (2019). Rock Drill Support Systems: Installation and Troubleshooting Handbook. IADC Press.
- Occupational Safety and Health Administration. (2022). Compressed Air Equipment Safety Standards for Construction Sites. OSHA Publication 3150.
Quzhou Shenjian Machinery Factory
As one of the most professional air leg manufacturers and suppliers in China, we’re featured by quality products and good service. Please rest assured to wholesale customized air leg from our factory. Also, quotation is available.
Address: No. 42 Bingang Middle Road, Quzhou City, Zhejiang Province
E-mail: 107467114@qq.com
WebSite: https://www.shenjianmach.com/
